Showing posts with label conversion. Show all posts

Wednesday, December 7, 2011

How to create your e-book by SB Jones.

The original guide I wrote in June can be found HERE.  It is still a great guide, but as I have said before, it's time to update it.  The same disclaimer as before, your mileage may vary with this guide and as time moves forward, new devices, programs, and features of e-readers may render this obsolete quickly.

The main change with this guide is the addition of how to create a Table of Contents for your e-book that allows your readers to jump to a desired chapter.  Even if you don't care about a TOC, you should have one.  Every little bit of polish makes your e-book look and feel that more professional.

This guide is for converting a Microsoft Word Document.  If you are working in another word processor, I am sure you can achieve similar results.

First, you need to get the programs that let you do all the work.
Mobi Pocket Creator, and Calibre.  You will also want to have a Nook or Kindle handy to side-load your novel, or use the Kindle for PC or Nook for PC apps to review your book.

First, make sure you are saving your your word doc as a .doc file and not a .docx file.  This is easily done by using the "Save As" feature in Word.  The reason for this is to avoid a lot of the meta data that gets added to the newer .docx files.


Now comes the grunt work.  Cleaning up that Word doc.  First you need to understand that the Kindle will auto indent your paragraphs.  So if your document has a tab indent, you will need to remove these.  You can do them manually or use the paragraph and page setup in word.


Next, we are going to look at some typesetting options.  I prefer to use single spacing with an extra half space after carriage returns.  When converted, the extra half space in my opinion gives it a nice look and makes it easy to read and looks nice and clean.  Remember, some people may read your book on their phone so you want it as readable as possible.  Having a massive wall of text is annoying.


Take your time with this step.  You may find yourself converting your book several times as you make adjustments to get it to look and feel the way you want.  You spend months or years writing the book, you can spend the hours needed converting it for upload.


Now lets create your Table of Contents.  This step is actually quite easy.  I didn't do it for my first novel because all of the information I found was convoluted and unnecessarily complicated.  Some even wanted you to manually code and write the TOC in HTML.

First, just navigate to your word doc and place the cursor at the start of a chapter.  Click the Insert tab, then the Bookmark button and give the bookmark a name.  I used Ch1, Ch2, etc for each of the chapters.


Once this is finished for each chapter, highlight where it says Chapter 1 (or whatever chapter titles you are using) and click the Insert Tab then Hyperlink.  In the popup box, click where it says "Place in This Document" and you should see all of the bookmarks you created.  Pick the correct bookmark and hit ok.  It's as simple as that.


You are going to want to test all of your links and verify that they jump to the correct chapter.  Also if you want, you can make each chapter title, jump back to the Table of Contents as well.  I don't do this because the e-readers have a "back" button already.  Less code means less opportunities for error.

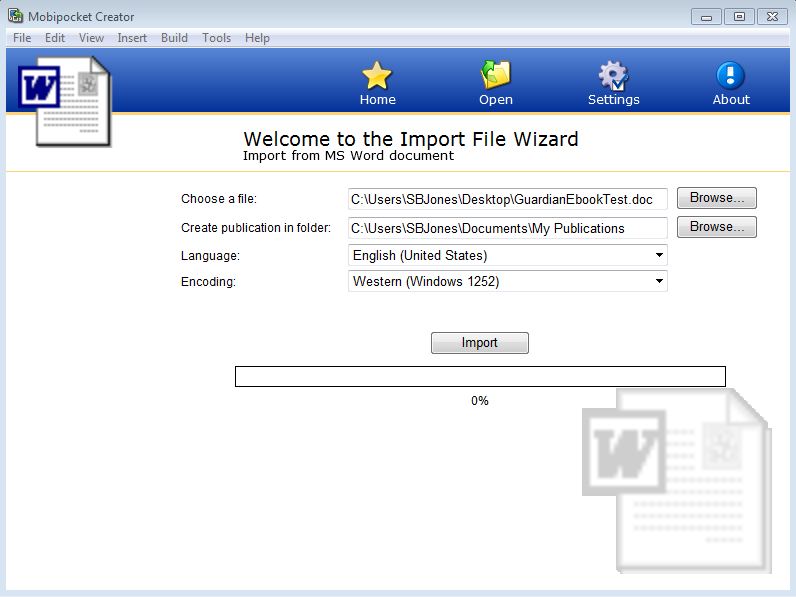
Lets move onto the conversion process now.  Close out of your word document, Mobi Pocket Creator doesn't like it if you have the document you are going to convert already open.

Launch Mobi Pocket Creator and click where it says Import from Existing File: MS Word document.


Browse to your document and click import.


You should see your file listed there now as an HTML file.  Click where it says Cover Image then the button that says Add a Cover Image.  Browse to your cover and press the Update button at the bottom.


This will take you back to the HTML file,  Now click where it says Metadata, and fill out the information.  Metadata is important so take a few minutes and fill out as much of it as you can.  If you don't know what to put, then just leave it blank.  Most of the information you have to give directly to Amazon or Barnes and Noble anyway.  When you are finished, make sure you hit the Update button to save the information. (ignore most of this if you are building test files to view your formatting and typesetting to save time)

Now, Click the build button.  If you wish to add any compression or encryption, this is where you can add it.  Once you have made your options.  Click the build button.


Once it's done building, I open the folder, and open the new PRC file with the Kindle for PC app for review.


Take your time and scroll through the book.  Verify all the links work for the TOC, the cover is embedded properly and note down any mistakes you find.  If you find anything you don't like or isn't working.  Go back to your word document and correct them and reconvert the book.

Once your book for Kindle meets your standards.  It's time to convert for Barnes and Noble.

Open up the Calibre program, and click on the Add book icon.


Navigate to where your newly created PRC file is and hit open.


Once you see your novel, select it and hit the convert icon.


You can browse through some of the menus if you want and change a lot of the meta data, add to it etc.  The inportant thing is to make sure in the top right corner under Output Format, EPub is selected.  Once you are satisfied, click the OK button and let it do its thing.  There will be a progress wheel in the bottom corner. When it stops, the conversion is complete.


Navigate to where the Epub file is and open it with the Nook for PC app, or side-load it to your nook for testing.  You may have to search for the file, but Calibre by default saves the file in its library folder.


Drop it into your Nook for PC and like before, verify that everything works, check the links again, and scan every page for errors.


If everything looks good, take it over to Amazon and Barnes and Noble and upload them and start selling books!


Monday, November 14, 2011

Barnes and Noble results and Guardian cover debut

Where to begin?  Saturday's book signing at Barnes and Noble was a huge success.  I would be lying if I said I wasn't nervous.  Having been a trainer for Dell, speaking and getting up in front of groups of people doesn't scare me or make me all rubber legged.  However, that was years ago.  Public events, crowds, and talking is a skill.  A skill I haven't used in a while so it was a bit rusty.  I met a TON of great people, and handed out close to 130 signed and dated postcards.

It's very interesting the dynamics of the people who walk into a Barnes and Noble.  The biggest surprise, but once you think about it, it kinda makes sense, was that very few people that I talked to owned an eReader.  The down side to this, is secondary online sales I expect are going to be low.  The last book signing had a nice spike in Kindle and Nook sales in the weeks following the event.  Regardless the exposure was priceless.  The staff of the store was great and impressed with the results.

So how well did the signing go?  Well...  Here is a picture of me acting all cool.  Some of the reactions people give are entertaining.  It's almost like there is some preconceived image of what an author looks like and I apparently don't fit the bill.  Even when I asked people if they would like to take a look at my book, they would still ask if I wrote it.


Book two: Guardian is just about finished.  There have been three complete edits and the book cover is finished as well.  I am ahead of schedule, and the manuscript is going to be sent to a few lucky beta readers.  So without further delay.  I present to you the full cover of The Eternal Gateway Book Two: Guardian.


I'm very pleased with it.  It was commissioned by JR Fleming.  And the book signing.  I sold out of every copy they had.  Achievement unlocked.

Wednesday, November 9, 2011

Countdown to Guardian and Barnes and Noble

This entry is a day later than normal, but I had the momentum going and I did not want to interrupt it.  Today, Guardian has been through three rounds of editing.  My editor and I finished up reading the last chapter out-loud only a few hours ago.  The only thing left for Guardian is to polish up the blurb and synopsis that goes on the back cover and hand out a beta copy or two for fresh eyes to experience the story without editor glasses on.  I had to spoil a bunch of book 3 for my editor as well.  At first she was content when I explained that the parts she wanted me to change or didn't make sense would be 'explained in the third book'.  But yesterday I had to let her in on everything.  As expected, everything made sense then.  The idea is that you can read through the trilogy and it will be a very good story.  But after the third book I want my readers to go back and re-read them and be totally shocked that they didn't see it earlier.  One of the original goals of the trilogy is 'replay value'.  Linear plots don't lend themselves well to this.


The most popular post on my blog by far is the entry in June about my eBook conversion guide.  I plan on rewriting it in the coming weeks when I convert Guardian to the Kindle and Nook formats.


This Saturday the 12th, I have a book signing at Barnes and Noble in Twin Falls Idaho for my first novel Requiem.  It starts at noon and I will be there until closing.  This is pretty cool because most self published authors never see their book on the shelf in a chain store, and even fewer have a book signing in one.  I didn't get any pictures of the last book signing so I will put fourth effort to get some this time.


Here is a closing picture.  It's not the greatest with the suns glare, but that is what I woke up to on Tuesday morning around 7:30am after the time change.  The water is warmer than the air so the river and waterfalls give off steam.  I wonder what story ideas this might inspire someone?

Tuesday, June 7, 2011

eBook Conversion Guide basic.

I have updated this guide as of Dec 7, 2011.  The updated guide can be found here.
http://theeternalgateway.blogspot.com/2011/12/how-to-create-your-e-book-by-sb-jones.html

This is a basic guide to convert your manuscript into .prc for the Kindle and .epub for the Nook.  I am not going to go over anything super fancy like embedding links or creating a table of contents.  Your mileage with this guide may vary with the versions of the programs you are using as well as this document ages, links may change and program versions get updated.  READ THE WHOLE GUIDE.  There are some formating issues you need to be aware of that I go over in detail at the end.

I used Microsoft Office Word 2007 to write my manuscript.  I also saved it as a .doc file.  This is an older compatibility mode and not the default .docx
Next is Mobipocket Creator version 4.2 build 41.  I downloaded this from the link provided by Amazon here.
And the last conversion app I used is called Calibre that can be found here.

Next I downloaded the pc reader versions of the Kindle and Nook to test my conversion and formating.  These apps can be found here.  KindlePreviewer  NookPCApp.


Now, of all the guide and information I found.  Amazon's own guide to create an eBook was the best by far.  All the other guides I found were teasers.  Just tiny bits of useful information that served no purpose other than trying to get you to buy a book or service to have it done.

Amazons guide says to convert to html and then run it through the Mobipocket app.  This is an unnecessary step now as the app will work right from a .doc file.  Simply click the option for ms word document.

Browse to your saved .doc file and press import.  If it hangs at 25% look behind the window and make sure you don't have a dialog box requesting permission to continue.  This can happen if you already have your manuscript open in Word.  It doesn't like that the file is already open in another program.


Now you should have a menu in Mobi that shows your manuscript listed as an .html file.  The next step is to add your cover.  Click the link that says Cover Image and press the 'Add a cover image' button.  Browse to where your cover art is and click open then click the update button.  I don't have my cover finished yet, so I am using a simple image that I created in MSPaint for this guide.


Next is Metadata.  This is important because the metadata is where a lot of information is stored about your eBook that can be used for searches, sorting, and all kinds of other information.  Think of this as where the title, singer, album etc that you see from MP3 files.  Also car radios that display the song and title for you get this info from the metadata.  If you do not know what to put in one of the fields, then leave it blank.  You should also see your book cover near the bottom as well.  Like before, when you have it filled out to your satisfaction, click the update button on the bottom.


Now click the build icon at the top of the window in Mobipocket Creator.


Here you get to set you compression levels and encryption options.  If you encrypt with DRM, the viewer wont display your eBook so for now use no encryption.  You can always go back and add it later.  Once you are satisfied, click build.  Open your Kindle Previewer app and drop in the prc file to view.  I recommend you go over every page to make sure it is the way you want it.  If you find any errors, correct them in your .doc file and repeat the process.  The only bit that takes any time to do is the 2 minutes to fill out the metadata.


Now, let me go over some of the problems I ran into.  Hopefully you read this part before you started.  On Amazons web page there is a line of text that doesn't stand out much, but it is extremely important.


Also your manuscript will automatically be left and right justified, so you don't need to do this in word.  So if your Word doc has tab indentation for each paragraph. You need to get rid of them or the Kindle will double tab and your paragraphs will start in the middle of the page.  Here is a clip from the word document and how the Kindle app uses its own formating.


What you need to do is remove the tabs manually, or change the paragraph layout to remove them in word.  Also you will need to get rid of any page numbers, headers and footers.  These will not line up at all when you convert to an eBook.  Also remember people can change the font size in the reader as well so page numbers in your manuscript will never line up with pages in an eReader.  So you should have something now that looks like this as a final product.


Take your time to make sure the Kindle version of your eBook is the way you want it.  Because this .prc file is what we are going to use to make your Nook version.  Also you need to do this process twice, because the ISBN number for the Nook version will be different than the Kindle version.  Make sure you go back and edit your copyright page and metadata to reflect this.

Now it is time to create the ePub file for Barnes and Noble's Nook.  I found that if you try to follow any guides about creating a PDF and then meat grinding it into an ePub file its going to suck.  I spent a good 5 hours trying to get it to work correctly and never got a final product that I would show the world.  PubIt's site sucked for information compared to Amazons and I spent more time trying to get a good epub book than everything else combined.  I almost gave up in frustration until I figured it out.  It was so simple, like 6 clicks and 30 seconds it was done.

So first open up Calibre


Then click the Add book button at the top.


Browse to your .prc file you just created for the Kindle with your updated isbn and copyright page and it should be added to the list of books.


You can click that blue "i" button next to the add book to review your metadata and edit it here but not the copyright page.  There are a few extra options you can fill out if you want.  Like if your book is part of a series.  When you are ready, make sure your book is selected and hit the convert button.

At the top left you should see input type as PRC and on the top right the output should be EPUB.  If it is not, then use the drop down to change it to EPUB and hit the ok button


Let it grind away.  You will see a buffering wheel next to jobs while it grinds out your epub book.  You can click on jobs and see the details if you like.  Once this process is complete, you will need to find your epub book.  When you added the .prc file, Calibre put it in its library folder under the author name.  Navigate to it, or do a search for *.epub and you should find it listed by the book title.  Drop the epub file into the Nook Reader.


Verify each that each page looks good and then congratulate yourself for creating your first Kindle and Nook eBook.  Hopefully if this is the first time you have created these file types, this guide helped and it did not take you more than an hour or two and feel proud for not spending a thousand dollars and waiting three months for someone else to do it.  If you have special formating in your book, like pictures, tables, bullet points and the like, hopefully they made it through the process ok.  If they did not, you may need to play with it, or hit up some of the Kindle forums.  There is a lot of helpful people there.

Monday, June 6, 2011

Upcoming eBook conversion guide

I intended to blog on Thursday the 2nd but I fell ill.  Then the weekend hit and I was very busy with helping my business on Western Days, and then lending the rest of my weekend for the SocialGeeks.com MegaLan that was held at the local community Collage.  (csi.edu)

It was a fun weekend.  We ended up going overboard a little bit with the number of available seats, but it is better to over prepare, than get swamped.  I spent most of my time acting as security and registration for the event.  Then I organized and ran the StarCraft II tournament.  This is the second time that I have run this tournament for SocialGeeks.  They are getting bigger, better, and faster so I am quite proud of that.  And everyone had a good time with it.

Back on topic of the publishing world and the status of my first book.  Requiem.  I still do not have a cover for the book yet, and that is all that remains before it will be available for the eReader world.  Paperback version may take a while longer to format.

On this journey to self publish a book, I spent many hours researching how things are done.  A lot of it makes sense, and a lot doesn't and even more just tends to piss me off.  Like the whole $25-$50 for someone to have their ISBN converted into a bar code.  This brings me to a future blog that I am going to do that seems to have little information available for.  I am going to write a guide on how to convert your manuscript into the formats you need for the Amazon Kindle and the B&N Nook.

If you are using a service already like CreateSpace or SmashWords who will do this for you and are happy with the results, then continue to do so.  If you are a first time author or looking for a guide in general, then this will be for you.  Having worked for Dell inc. for 8 years, I am more familiar with the computer world than the average bear.  So when I found a websites that offered conversion services for $100-$1000 depending on the size of your book and anywhere from 15-90 days for the process to complete, I figured I would learn how to do it myself.  I don't have 3 months to wait and an extra thousand dollars laying around, and it smelled of the same bad deal like charging for a bar code.

I spent about 6 hours of research, but when it came down to actually doing the conversion.  It took about 2 hours to download the apps, modify my manuscript format and convert.  Knowing what I do now, it shouldn't take more than 30 minutes to create both your Nook and Kindle ebooks.  So look forward to this in an upcoming blog.